前端的Bundler有很多,比如webpack、parcel、esbuild等,他们的实现非常复杂。但其实如果只看其中的核心:打包JS文件 这个功能来看,想要让他真的能跑起来,并不困难。
本文中实现的Bundler将能做到
- 打包 JS、TS
- 生成 web、node产物
- 正确处理package依赖
代码仓库:https://github.com/fun4wut/toy-bundler
整体流程
JS文件 -> Transform -> 查找依赖 ->加入依赖图 -> 生成代码
定义Module
其实依赖图的每个节点,将文件的基本信息记录下来。
这里的id为方便,直接用的递增方案
depDict是处理 require时的路径 -> id 的映射。
let globalIdCounter = 0;
export class ModuleNode {
  id: number;
  /** 绝对路径 */
  filePath: string;
  ext: string;
  code: string;
  deps: string[];
  depDict: Record<string, number> = {};
  constructor(path: string) {
    this.id = globalIdCounter++;
    this.filePath = pathUtils.resolve(path);
    this.code = transformToCjs(this.filePath);
    this.deps = getDeps(this.code);
    this.ext = pathUtils.extname(this.filePath);
  }
}
Transform
因为我们的Bundler不需要 Tree Shaking等高级能力,所以直接把 JS / TS 文件全部转成 CommonJS格式即可。可以选用babel等transform工具来进行,这里使用esbuild,原因是
- 没必要转到es5
- 快
import { transformSync } from 'esbuild';
/**
 * 把文件转成cjs格式
 * @param path 文件路径
 */
export function transformToCjs(path: string) {
  try {
    const code = fse.readFileSync(path).toString();
    const res = transformSync(code, {
      format: 'cjs',
      loader: 'ts',
      target: 'es6'
    });
    return res.code || '';
  } catch (error) {
    console.error('transform err', path, error);
    return '';
  }
}
查找依赖
我们需要把每个js文件的依赖找到,并加入到依赖图中。
这里又分为几步,查找所有依赖的路径 -> 对每个路径进行寻址 -> 重复Transform操作
转化成cjs格式之后,直接使用 detective 来查找代码中所有require的路径。
import detect from 'detective';
/**
 * 获取依赖列表
 * @param code
 * @returns
 */
export function getDeps(code: string) {
  const originalDeps = detect(code);
  return originalDeps;
}
对require路径的寻址操作其实等价于 node 中的 require.resolve,但是该函数不支持自定义查找开始路径,所有换用 resolve 包来去实现
对于 两类依赖,我们是不能打包打进去的,需要额外标记一下
fs,path等node标准库- fsevents等引入了native文件的库
  // 如果resolve出来的是相对路径,说明其为node标准库,不打包进去
  canBundle = (path: string) => {
    return pathUtils.isAbsolute(path);
  }

  resolveDependency = (path: string, srcFilePath: string): Dependency => {
    const EXTERNAL_MOD_CODE = 2333;
    try {
      const absPath = resolve.sync(path, {
        basedir: pathUtils.dirname(srcFilePath),
        extensions: ['.js', '.ts'],
        preserveSymlinks: false,
        packageFilter: pkg => {
          // 在配置项里显式声明不进行打包的库,并在resolve过程中进行拦截
          if (this.option.external.includes(pkg.name)) {
            const err: any = new Error('HIT EXTERNAL MODULE');
            err.code = EXTERNAL_MOD_CODE;
            throw err;
          }
          return pkg;
        },
      });
      return {
        absPath,
        canBundle: this.canBundle(absPath),
      }
    } catch (error) {
      if (error.code !== EXTERNAL_MOD_CODE) {
        throw error;
      }
      return {
        canBundle: false,
        absPath: '',
      };
    }
  }
获取到依赖的绝对路径后,就可以进行transform,并加入依赖图了
我们的依赖图使用 Map来去维护 绝对路径 -> 具体Module 的映射。
const DIRECT_REQUIRE = -19260817;

pathToModule: Map<string, ModuleNode> = new Map();
addEntry(entry: string) {
    const entryNode = new ModuleNode(entry);
    this.pathToModule.set(entryNode.filePath, entryNode);

    for (const mod of this.pathToModule.values()) {
      mod.deps.forEach(d => {
        const { absPath, canBundle } = this.resolveFn(d, mod.filePath);
        if (!canBundle) { // 无法打包进去的,直接require
          mod.depDict[d] = DIRECT_REQUIRE;
          return;
        }
        // 如果该文件已经加入过依赖图了,处理下依赖映射即可,直接跳过
        if (this.pathToModule.has(absPath)) {
          mod.depDict[d] = this.pathToModule.get(absPath)!.id;
          return;
        }
        const depNode = new ModuleNode(absPath);
        this.pathToModule.set(absPath, depNode);
        mod.depDict[d] = depNode.id;
      });
    }
}
代码生成
我们知道,nodejs文件的运行,其实是包在一个函数里,文件里的 module , require ,都是这个函数的形参。require的返回其实也就是 module.exports 的值
我们的Bundler可以这么做,通过给文件套一个大函数的形式,去魔改其中 module , require 的定义。
因为前文提到,我们仍有些模块无法被打包,所以需要留一个原生node require的入口,避免被新定义的require给覆盖了
const __require = typeof require !== 'undefined'
    ? require
    : () => new Proxy({}, {
        get: () => ({}) // 非node环境下使用require, mock出一个可以无限套的oject, 避免程序挂掉
    }
);
再来看怎么对 module , require 进行魔改
- module就是构造一下对象,其中再设置好其属性exports
- require要复杂一点,因为代码里require的还是相对路径,所以需要用到前文提到的映射关系(depDict),来找到相对路径所对应的module
- 如果require的是没打包进去的(id被特殊标识了),使用原生的require来去调用
- module可以缓存一下,避免重复的求值和循环依赖导致的死锁
const moduleCache = {}; // 避免循环引用, 参考node https://github.com/nodejs/node/blob/v4.0.0/lib/module.js#L298-L316
const resolveModule = (id) => {
    const { factory, map } = modules[id];
    /**
       * 1. 检查缓存,如果缓存存在且已经加载,直接返回缓存,不做下面的处理
         2. 如果缓存不存在,新建一个 Module 实例
         3. 将这个 Module 实例放到缓存中
         4. 通过这个 Module 实例来加载文件
         5. 返回这个 Module 实例的 exports
         ### 先放缓存,再加载文件 可以避免循环引用的死锁 ###
       */
    if (moduleCache[id]) {
        return moduleCache[id].exports;
    }
    const localModule = {
        exports: {},
    };
    moduleCache[id] = localModule;
    const localRequire = (requireDeclarationName) => {
        const depId = map[requireDeclarationName];
        return depId >= 0
          ? resolveModule(depId)
          : __require(requireDeclarationName);
    };
    // 最后调用
    factory(localModule, localModule.exports, localRequire);
    // 把module.exports返回出来给require用
    return localModule.exports;
}
最后我们要把入口文件的export给导出来,这里就需要对环境做一下判断:
- 如果是node环境,那么直接用
module.exports的形式即可 - 如果是浏览器环境,则把结果挂载在全局对象上
const res = resolveModule(0); // 入口文件的id是0
if (typeof exports === 'object' && typeof module !== 'undefined') {
  module.exports = res;
} else {
  (globalThis || self || global).myBundle = res;
}
有了上面的模板函数,我们也就可以倒推出依赖图的代码生成了
dumpFromTemplate = () => {
    return `
      ${this.id}: {
        factory: (module, exports, require) => {
          ${this.code}
        },
        map: ${JSON.stringify(this.depDict)}
      }
    `;
}
实战操作
我们来写一个简单的demo,其中会涉及
- 循环引用
- 原生.node文件
- Npm package
- Esm, cjs混合
- cli场景
// a.js
module.exports.test = 'A';
const modB = require('./b');
console.log( 'modA:', modB.test);
module.exports.test = 'AA';
// b.js
module.exports.test = 'B';
const modA = require('./a');
const _ = require('lodash');
console.log( 'modB:', modA.test);
console.log('dddd', _.add(1, 2));
module.exports.test = 'BB';
// c.js
import modA from './a';
const { join } = require('path');
const { prompt } = require('enquirer');
(async() => {
const response = await prompt({
type: 'input',
name: 'username',
message: 'What is your username?'
});
console.log(response);
console.log(join(modA.test, '2222'));
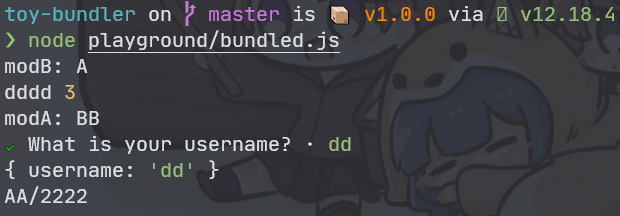
})()直接node运行结果:
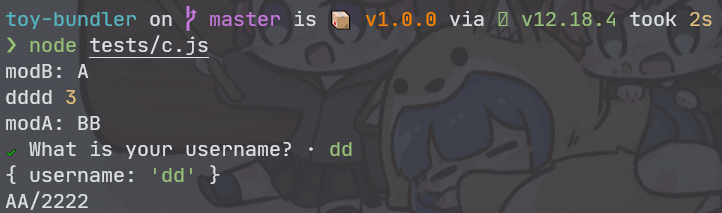
打包后运行结果:
参考资料
- 极简版:https://github.com/iggredible/bandler/blob/master/index.js
- node加载详解:https://www.zhihu.com/question/62791509/answer/2345796861
本博客所有文章除特别声明外,均采用 CC BY-SA 3.0协议 。转载请注明出处!